
The Market Garden campaign is a multiplayer game taking place on 4 tables simultaneously. Each of them is a key location for whole Operation: Hell's Highway, Nijmegen, Arnhem Bridge and Drop Zone. Campaign consist of two battles on each table.
Allied forces have three 1000pts paras platoons (two British and one US) based on Market Garden selector, and XXX Corp 1500pts Tank Platoon based on Normandy selector. Paras platoons starts game on adequate tables (US Paras: Nijmegen, British Paras: Arnhem Bridge and Drop Zone, XXX Corp on Hell's Highway)
Axis forces consist of three reinforced platoons based on Normandy 1944 selector and 2nd SS Panzer Korp (1200pts Tank Platoon based n Normandy selector). Tank platoon could start first game on any table except Hell's Highway, when reinforced platoons starts elsewhere.
The Allied goal is to move out XXX Corp (minimum three non transport units) through The Road on the north side of Arnhem Bridge table, when German is to stop enemies and inflict them maximum losses.
This campaign was played on September 17th 2016 in Warsaw Poland. Relation with english summary Here.
Special rules for each table:
Moving between tables: There is possible to move XXX Corp units between tables: Hell's Highway to Nijmegen and Nijmegen to Arnhem Bridge during the battle and between the battles. Units moved to another table are taken over by local Allied leader (dices are moved into different sack). The XXXC commander should keep any of his units on the Hell's Highway for whole the game (till second battle lasts)
IISS Korps: this tank platoon could appear on any table (except Hell's Highway) on each battle, which means it can fight each battle on different location.
One road: the important issue for XXXC is to keep supply chain for units on front. Starting and ending points of "The Road" should be in Allied hands otherwise all XXXC units on front are without supply (general rule from Battleground Europe scenario book).
Bailey Bridge: XXXC commander could buy 30CWT Truck to represent Bailey Bridge. Unit loses its transport capabilities till used. When the Nijmegen bridge is blown the Allies could use Bailey bridge unit to rebuild the passage (by put a truck next to the river).
Shoot the purple!: XXXC commander has free Air Observer
Thickening defence: German reinforced platoons have additional Anti tank gun slot
Limited resources: German reinforced platoons may comprise only one battle vehicle from slots: Armored Car or Tank/SP gun
Pushing the wrecks: A tracked armored vehicle could push a wreck on its road. When such a unit starts its activation sticked to the wreck a Advance order is given and player makes morale check modified by difference between armor value of pushing and pushed vehicles. If succeeded the wreck is pushed away, if failed: the pusher receives 1 pin marker and its order dice is immediately flipped to Down.
Hell's Highway
The table is partially covered by woods and low vegateation, there are also few farms. Along the whole table goes The Road. In the middle it crosses with another road coming from East to West. There are six markes at minimum distance 18" each. At start of the game all markers (except one in British Deployment zone) are owned by Germans. Two markes should be fixed at the ends of Te Road.
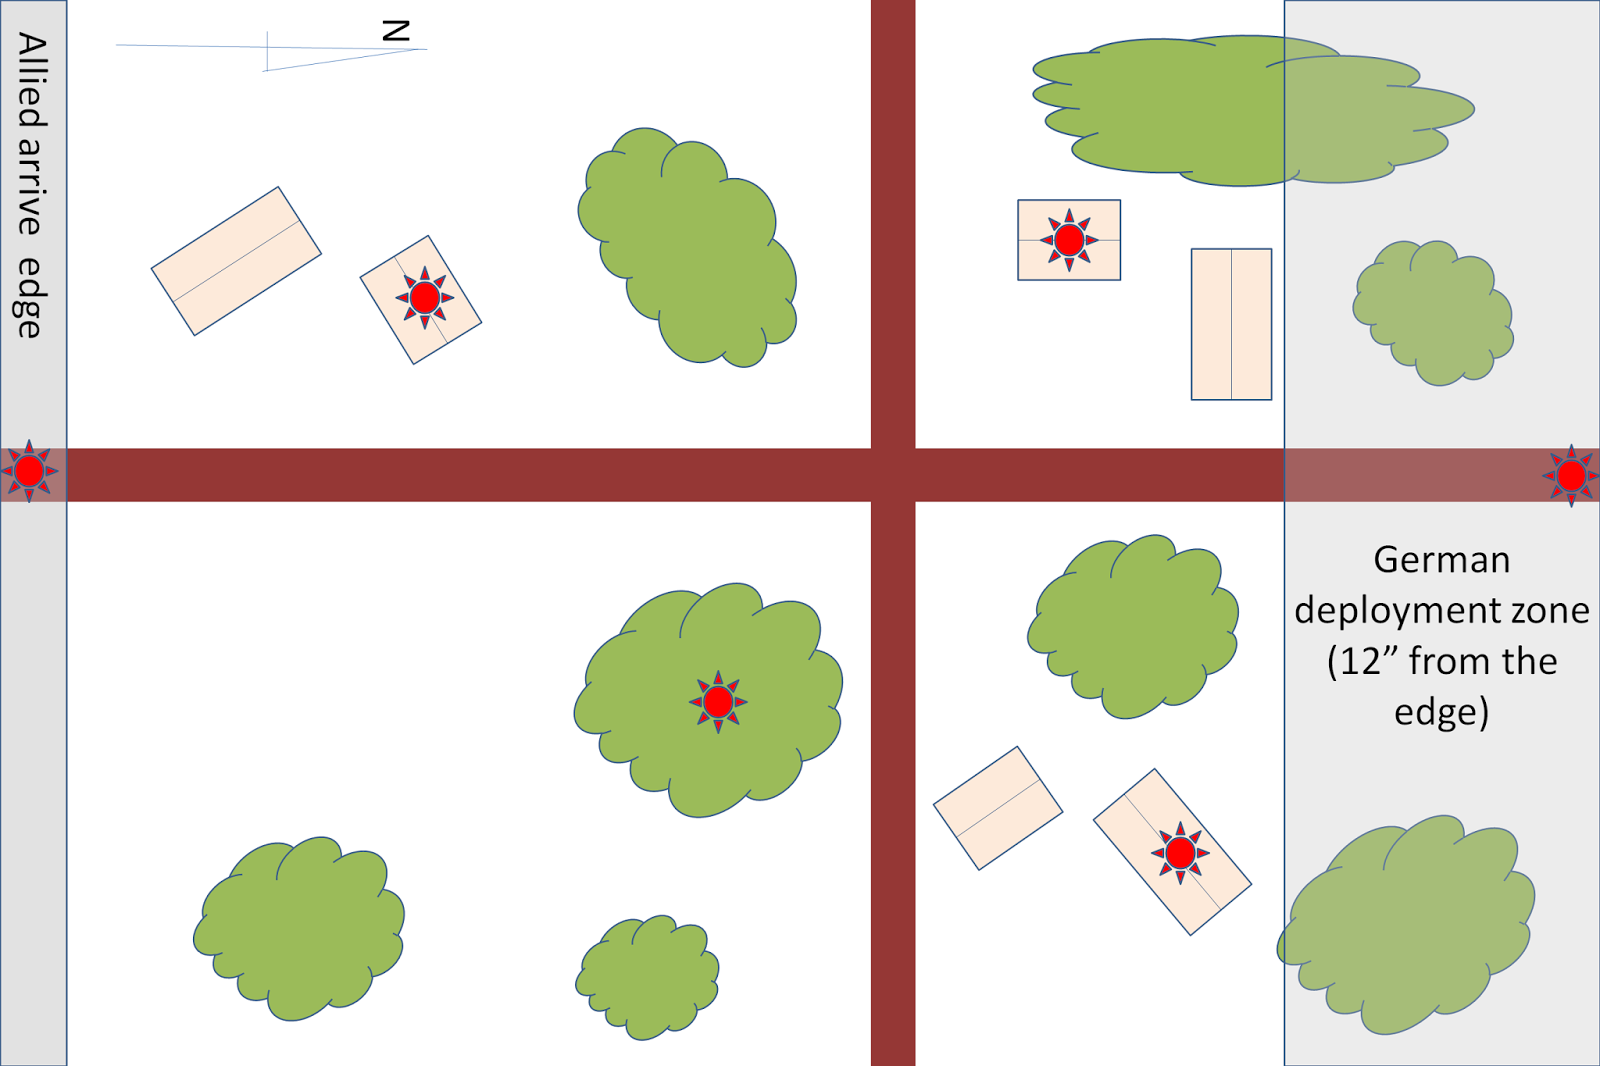
First Battle: In this scenario German player is a Defenter and British is an Attacker. Half of German forces (rounding up) may be deployed anywhere in their deployment zone (see above). If at cover, have Hidden Setup atribute. The rest of German force arrives as a reserve in the 2nd turn. British forces arrive as a first wave in the first turn. British force has Preparatory Bombardment before a battle. Germans gain 1VP for every British eliminated unit and 1 VP for each marker controlled after battle. British gains 1VP for each non transport unit moved out through North edge of the table and 1VP for each German unit eliminated. The game lasts after 6th turn. If British player controls both ends of The Road he can move out any of his units to Nijmegen table before second battle starts.
Second Battle: During the second battle players use same units as in first (except those British units which were moved out). British player deploys first. Units are deployed 12" around owned markers and not closer than 12" of deployed enemy units. If side doesn't control aby marker, all forces arrieve through south edge (British) or East (German). During the second battle British player can also move out his units in similar way as in firts battle. Second battle lasts afetr 6th turn.
Nijmegen
Main object on this table is a impassable river which runs along in 1/3th of width. From South to North in the middle of table there is The Road that crosses river. On the south bank there is a hill and a few urban buildings. On the northern side of the river are there are few farm houses, small woods. 3" north from the bridge there is a defence point (made of sandbags or similar) where detonator is located (see below). On the table 6 markers are located. Two of them on the endings (northern and southern) of The Road, two on southern and two on northern bank of river.

First Battle: During first battle German player is a defender and US is an attacker. Deployment for this battle is similar to Hold until relived scenario from rulebook. US reinforcments coming from south ang German from northern edge of table.
Germans gain 1VP for every US unit eliminated and 1 VP for each marker controlled at the end of the battle. US player gains 1VP for each non transport unit of XXXC which move out from northern edge and 1VP for each German unit eliminated. The game lasts after 6th turn.
Second Battle: During the second battle players use same units as in first (except those units from XXXC which were moved out). German may switch forces here with IISS Panzer Korp. Allied player deploys first. Units are deployed 12" around owned markers and not closer than 12" of deployed enemy units. If player doesn't control aby markers, all forces arrieve through south (Allied) or north (German) edge. During the second battle Allied player can also move out XXXC units in similar way as in firsts battle. Second battle lasts after 6th turn.
Special rules for Nijmegen table:
XXXC: any XXXC units that arrive during any battle enter the table from US owned edge.
Detonator: Nijmegen Bridge is prepared to be blown. On the north side of river 3" from the bridge there is defensive position (giving hard cover) where the detonator is hidden. Unit starting his activation (except firs turn of first battle) inside compartment could Blow a bridge using Down order. German forces take minus 10pts for blowing the Bridge.
Light forces: US forces cannot use any vehicles except jeeps
Arnhem Bridge

First Battle: During first battle German player is a defender and British is an attacker. Deployment for this battle is similar to Hold until relived scenario from rulebook. British reinforcments coming from West and German from North or South (German player write down chosen edge before a battle).
Second Battle: During the second battle players use same units as in first (except those units from XXXC which were moved out). German may switch forces here with IISS Panzer Korp. British player deploys first. Units are deployed 12" around owned markers and not closer than 12" of deployed enemy units. If player doesn't control aby markers, all of his forces arrive from own edge (British: West, German: the chosen one). XXXC units can move in the table during any battle through south zone. XXXC units could move out through north edge of table. If three (non transport) XXXC units move out this way Allies win automatically. Second battle lasts after 6th turn.
Special rules for Arnhem Bridge table:
Full surprise: If at the begining of battle first chosen dice is German it returns to a bag and another dice is drawn (which should be used)
Limited supply: During each turn British side should checks if a units in Arnhem have supply (see special rules in Drop Zone table). If British are out of supply in particular turn player rolls D6 for every unit using Fire or Advance order. Result 1-2 means that unit saves supply and doesn't fire its weapon, in any other result unit acts normally.
XXXC: during any battle XXXC units can arrive to Arnhem (from Nijmegen table) through south zone. If at least 3 non transport XXXC units move out through north edge of table Allied side win automatically.
Drop zone
The table is a countryside with some fields, woods, bushes and rural buildings. On the table lies 6 numbered (1-6) markers distanted 18" each. At the begining of battle all of them are possesed by Germans. The goal is to control as mamy markers as possible during the whole battle. Each side gains 1VP for every enemy unit eliminated during a battle, 1VP for every marker controlled at the end of a battle.

First Battle: There are no units on a table at the begining. British units (Attacker) drop using parachutes (see special rules below) or gliders (see Geronimo rules) during first turn. German units aproach to the table from random directions (see below).
Second Battle: During the second battle players use same units as in first. German may switch forces here with IISS Panzer Korp. British player (Defender) deploys first. Units are deployed 12" around owned markers and not closer than 12" of deployed enemy units. If player doesn't control aby markers, all his forces arrive from chosen (one) edge. Second battle lasts after 6th turn.
Special rules for Drop Zone table:
Full surprise: If at the begining of battle first chosen dice is German it returs to bag and another dice is drown (which should be used)
Supply drop: At the begining (before any dices are taken out from a bag) of each turn (except first turn of first battle) D6 is rolled. The number means on which marker supply for Red Devils in Arnhem were dropped. If this point is controlled by British nothing happen, when possesed by Germans then British forces in Arnhem undergo to Limited supply rule (this turn!)
Parachute drop: when (infantry) unit is dropped using parachute mark a point on table, then roll scatter dices. An arrow sets a direction in which unit had been lifted (if "Hit" land on chosen point) a number means a distance (in inches) of lifting. If landing point is in wood or building unit gains D2 pins and D6 hits, penetration +2. "Missfire" means that unit gains D6 hits penetration 2+. After a succesfull parachute drop unit can make an Consolidation move similar to this after hand2hand combat.
Glider drop: Geronimo rules
Urgent need: During the first battle German units arrive on table from random direction. For every unit roll D6:
1-2 - put Down order (outside the table) on unit this turn
3 - unit arrives from north edge immediately
4 - unit arrives from east edge immediately
5 - unit arrives from south edge immediately
6 - unit arrives from west edge immediately
All German units that didn't arrive on table during a first turn can approach in the second as a reserve from chosen direction
Brak komentarzy:
Prześlij komentarz